
The Complete Guide to Metal Roof Drip Edge Installation: Types, Steps, and Protection Techniques
Water damage is one of the most common and costly problems for roofing systems today. Without proper water diversion components, even the most expensive roofing materials can fail prematurely, leading to rot, mold, and structural damage. The metal roof drip edge installation process is often overlooked, yet it’s critical for protecting roof edges and directing water away from fascia boards and foundations, helping prevent costly damage.
In this comprehensive guide, you’ll learn everything about drip edge components—from the different types available to a detailed installation walkthrough. We’ll cover the tools needed, proper installation techniques, and common mistakes to avoid. Whether you’re a DIY enthusiast tackling a roofing project or a contractor looking to refine your techniques, this guide will help you master metal roof drip edge installation for long-lasting roof protection.
Understanding Drip Edge and Its Critical Function
Drip edge is a specialized metal flashing installed at a roof’s edge to control water flow away from the fascia and prevent water from getting under the roofing materials. With proper installation, this can help you:
- Prevent water from rotting fascia boards and roof decking
- Support the edge of shingles or metal panels
- Protect underlying wood components from moisture damage
- Help keep pests from entering the roof structure
- Provide a clean, finished look to the roof edge
Types of Drip Edge Profiles
There are several drip edge profiles available, but the two most common are Type C and Type D:
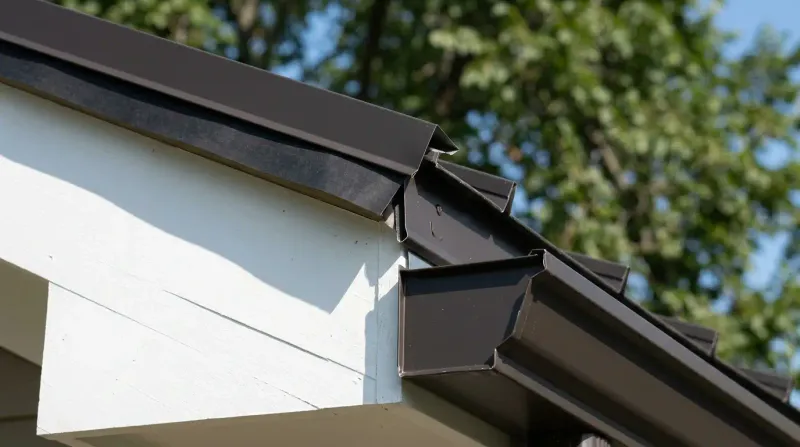
Type C Drip Edge: Also called an “L-style” drip edge, this profile features a simple 90-degree bend. It’s commonly used on rake edges (the sloped edges of a roof). Type C drip edge works well on rake edge on a roof where water typically doesn’t flow as heavily.
Type D Drip Edge: Also known as “T-style” or “D-metal,” this profile features an extended flange that directs water farther from the fascia. The design includes a hemmed edge and kick-out to improve water diversion. This type is ideal for eaves (horizontal roof edges) where water concentration is highest.
Materials for Drip Edge
Drip edge is typically available in:
- Aluminum: Lightweight and corrosion-resistant
- Galvanized steel: Durable and economical
- Copper: Premium option with excellent longevity
- Painted steel: Offers color-matched options
The material you choose should be compatible with your metal roofing system to prevent galvanic corrosion between dissimilar metals.
Essential Tools and Materials Checklist
Before beginning your drip edge on a roof installation, gather these necessary tools and materials:
Tools:
- Aviation snips (for cutting metal)
- Hammer or pneumatic nailer
- Tape measure
- Chalk line
- Level
- Utility knife
- Safety glasses and gloves
- Ladder or roof scaffolding
Materials:
- Drip edge flashing (Type C for rakes, Type D for eaves)
- Roofing nails (1¼-inch galvanized roofing nails)
- Roofing cement/sealant
- Underlayment
- Metal roofing panels or shingles
Having all these items prepared will streamline the installation process and help ensure each step is executed properly.
Step-by-Step Installation Process
Preparing Your Roof
- Ensure the roof deck is clean, dry, and in good condition
- Remove any damaged wood or existing drip edge
- Measure and mark the position for the new drip edge
- If replacing an entire roof, install drip edge on a roof before underlayment at eaves, but after underlayment at rakes
Installing Drip Edge Along the Eaves
The eaves are the horizontal edges of your roof that typically overhang the facade and channel water into the gutters.
- Start at one corner of the roof and work across the eave
- Place the drip edge so the flat flange rests on the roof deck and the bent section extends over the edge
- The drip edge should extend ¼ to ¾ inch beyond the roof edge
- Secure with roofing nails placed 12 inches apart
- Nails should be positioned 2 inches up from the edge of the roof
Installing Drip Edge Along the Rake Edges
After your underlayment is in place:
- Position the drip edge so it overlaps the eave drip edge at the bottom corner
- The flat flange should lie on top of the underlayment
- Nail every 8-12 inches along the rake
- At the peak, overlap opposing rake drip edges or cut to fit precisely
Proper Overlap and Fastening Techniques
Proper overlap is crucial for preventing water intrusion:
- Overlap sections of drip edge by at least 1-2 inches in the direction of water flow
- At corners, the rake drip edge should overlap the eave drip edge
- Secure the drip edge with roofing nails, not staples or screws that might crack the metal
- Place nails in the upper portion of the drip edge to avoid creating entry points for water
For metal roofing systems, consider these additional tips:
- Use fasteners compatible with your drip edge material
- Apply a small amount of roofing sealant at overlaps
- Ensure the drip edge is snug against the roof fascia trim to prevent gaps
Coordinating with Other Roof Components
How to Install Gutters on a Metal Roof
How to install gutters on a metal roof properly requires careful coordination with your drip edge:
- Install the drip edge first, ensuring it extends past the fascia by about ¼ inch
- Position gutter hangers so the front edge of the gutter sits just below the drip edge extension
- The gutter should be installed so that water from the drip edge falls into the gutter, not behind it
- Use gutter straps or hidden hangers that attach to the roof fascia for secure mounting
For complete protection, consider professional gutter installation services that properly integrate with your roofing system. Understanding how to install gutters on a metal roof is crucial for maintaining proper drainage and preventing water damage to your home’s foundation.
Integrating Step Flashing and Other Flashing Types
What is step flashing? It’s a series of L-shaped metal pieces used where a roof meets a wall or chimney. To coordinate this with the drip edge:
- Install drip edge along eaves first
- Apply underlayment over the drip edge at eaves, but under at rakes
- Each piece of step flashing should overlap the previous piece by at least 2 inches
When properly integrated, roof flashing creates a complete water-diversion system that protects all vulnerable areas. The valley flashing metal roof, together with the drip edge, helps channel water properly off the roof.
Common Installation Mistakes and How to Avoid Them
Even experienced installers can make these common errors when installing roofing edge trim:
Incorrect Positioning
- Mistake: Installing the drip edge flush with the roof edge
- Solution: Extend the drip edge ¼ to ¾ inch beyond the roof edge
Improper Fastening
- Mistake: Using too few nails or placing them too close to the edge
- Solution: Space nails 8-12 inches apart and place 2 inches up from the edge
Neglecting Proper Overlaps
- Mistake: Butting sections together without overlap
- Solution: Overlap sections by 1-2 inches in the direction of water flow
Wrong Installation Sequence
- Mistake: Installing drip edge after underlayment at eaves
- Solution: At eaves, the drip edge goes under the underlayment; at rakes, it goes over
Improper Treatment of Corners and Transitions
- Mistake: Creating gaps at corners where the eave and rake meet
- Solution: Ensure rake drip edge overlaps eave drip edge at corners
Avoiding these mistakes during roof edge trim installation will significantly improve your roof’s water management and extend its lifespan. Selecting the right roofing edge trim material that matches your metal roofing system is also crucial for preventing galvanic corrosion.
Brandon J Roofing: The Team You Can Count On
Proper metal roof drip edge installation is far more than a minor detail—it’s an essential component that protects your entire roofing system from water damage. By following the steps outlined in this guide, you can ensure your drip edge performs effectively for years to come. Remember that the small details matter: correct overlap, proper fastening, and integration with other components like flashing on a roof and gutters create a complete water management system.
Brandon J Roofing brings years of expertise to every roofing project, understanding that components like drip edge, purlins, and drip edge roofing require precision installation for optimal performance. While many homeowners can tackle this project with proper guidance, our professional team ensures every detail is addressed with industry-best practices, saving you time and preventing costly errors. For a roofing system that stands the test of time, trust the experienced professionals at Brandon J Roofing.