Fix Leaks Now: How to Seal a Metal Roof (Materials & Steps)
Metal roofs are tough, but they’re not invincible. Leaks can sneak in through seams, fasteners, or flashing — and when they do, they can cause serious damage fast. Whether you’re dealing with a fresh drip after a storm or a slow, sneaky leak that’s been building for months, knowing how to seal a metal roof can save you time and money.
In this guide, we’ll walk you through everything you need to tackle the job — from prepping the surface to choosing the right sealant and applying it correctly. We’ll also cover when it makes more sense to call a professional. Keep reading, because the right information now could prevent a much bigger headache later.
Step 1: Preparation Is Everything
Before you apply a single drop of sealant, you’ve got to prep the surface. Skipping this step is one of the biggest mistakes DIYers make — and it’s why sealants fail early.
Clean the Surface First
You can’t seal a dirty roof. Dust, debris, algae, and grime will prevent the sealant from bonding properly. Here’s how to clean a metal roof effectively:
- Use a pressure washer or stiff-bristle brush
- Apply a roof cleaning solution or mild detergent
- Rinse thoroughly and let it dry completely
- For stubborn clean roof stains, use a dedicated metal roof cleaner or a diluted bleach solution
If you’re also dealing with a steel roof, check out this guide on steel roof cleaning for more detailed steps.
Remove Rust and Corrosion
Rust is the enemy of a good seal. If you’ve got rust spots, deal with them before moving on.
- Use a wire brush or angle grinder to scrub off loose rust
- Apply a rust-inhibiting primer to any bare metal
- Let the primer cure fully before moving to the next step
Check for Hail Damage
If your area recently had a storm, look for signs of hail damage on metal roof surfaces — dents, cracks, or displaced fasteners. Minor dents may not cause leaks right away, but they can weaken the roof over time.
Apply a Primer (When Needed)
Some sealants bond directly to clean metal. Others need a primer. Always check the sealant manufacturer’s instructions. Using the right primer improves adhesion and extends the life of your repair.
Step 2: Choosing the Right Sealant
Not all sealants are created equal. Here’s a breakdown of the three most common types so you can pick the best one for your project.
Silicone: Excellent flexibility, UV resistant, waterproof
Acrylic: Paintable, easy to apply, affordable
Urethane: Very durable, great adhesion, flexible
Which One Should You Use?
- Silicone sealant — Best for areas with heavy moisture or ponding water (great for flat metal roof repair)
- Acrylic sealant — Good for small cracks and gaps in mild climates; budget-friendly
- Urethane sealant — Best for high-traffic areas or roofs with lots of movement
If you’re also considering painting copper roof surfaces after sealing, acrylic is your best bet, since silicone doesn’t accept topcoats well. It’s also worth knowing how to clean asphalt roof surfaces if you’re working on a multi-surface property, as cleaning methods vary by material and can affect how adjacent metal sections are treated.
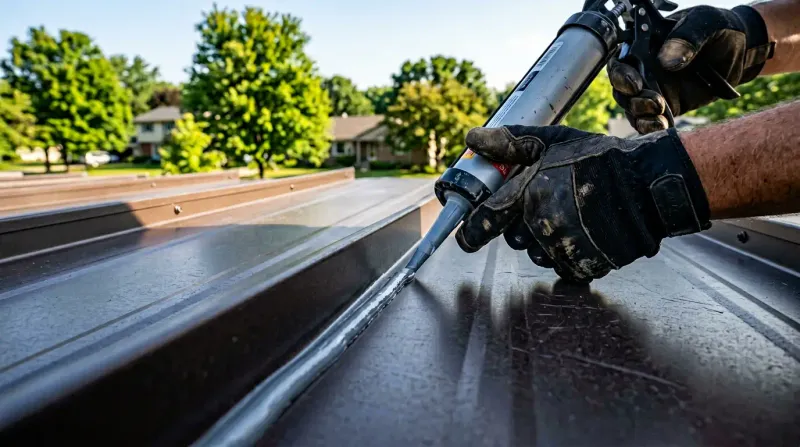
Step 3: How to Seal a Metal Roof — Application Guide
Now that your surface is clean and your sealant is chosen, it’s time to get to work. This is the heart of how to seal a metal roof — and doing it right makes all the difference.
Sealing Seams
Seams are one of the most common leak points on metal roofs.
- Clean the seam area thoroughly
- Apply butyl tape or seam tape along the joint
- Press it firmly into place, removing air bubbles
- Apply your chosen sealant over the tape as a secondary layer
- Smooth it out with a putty knife or gloved finger
Sealing Fasteners and Screws
Fasteners loosen over time, allowing water in. Here’s how to fix them:
- Tighten any loose screws first
- Replace any missing or badly corroded fasteners
- Apply a dab of sealant over each fastener head
- Use a brush to spread it slightly beyond the fastener edge
- Let it cure fully before exposing it to rain
Sealing Flashing and Penetrations
Flashing around vents, chimneys, and skylights is a prime spot for leaks. This is closely tied to understanding metal roof transitions and how they interact with sealant over time.
- Remove old, cracked caulk or sealant completely
- Clean the flashing and the surrounding metal
- Apply new sealant in a continuous bead around the perimeter
- Press mesh fabric into the sealant for reinforced areas (optional but helpful)
- Apply a second coat once the first has cured
Pro Tip: Don’t rush the curing process. Most sealants need 24–48 hours to fully cure. Rain during that window can ruin the repair.
Step 4: Troubleshooting Persistent Leaks
Sometimes a leak keeps coming back even after you’ve sealed it. Here’s how to track down the real source.
Common Reasons Leaks Keep Coming Back
- You sealed the symptom, not the source. Water travels before it drips, so the actual entry point may be several feet away from where you see the leak inside.
- The sealant didn’t bond properly. This usually means the surface wasn’t clean or dry enough.
- The damage is too large for sealant alone. Big gaps, significant rust, or structural issues need more than a tube of caulk.
How to Find the Real Leak Point
- On a dry day, use a garden hose and run water over sections of the roof one at a time.
- Have someone inside watching where the water appears.
- Mark each problem area before you come down.
- Address each point individually.
How to Seal Roof Leaks That Keep Coming Back
If the leak returns after resealing, consider:
- Using a mesh-reinforced sealing system instead of sealant alone
- Applying a full roof coating over the affected area
- Checking if the flashing itself is damaged beyond repair
For more insight into why leaks form in the first place, take a look at these common roof leak causes — understanding the “why” makes fixing the “what” a lot easier.
Step 5: Maintenance Tips to Prevent Future Leaks
Sealing a leak is just one part of the equation. Keeping up with maintenance helps you catch problems before they become expensive repairs.
Regular Maintenance Checklist
- Inspect your roof twice a year — spring and fall are ideal
- After major storms, check for hail damage on metal roof panels and loose fasteners
- Keep gutters and drains clear — blocked drainage puts extra stress on seams
- Reapply sealant every 3–5 years on high-movement areas like seams and fasteners
- Monitor for rust and treat it early before it spreads
How Often Do You Replace Your Roof?
Metal roofs typically last 40–70 years with proper care. But how often you replace your roof really depends on maintenance. A well-sealed, regularly inspected metal roof can go decades without needing full replacement. Neglect it, and that timeline shrinks fast. If you’re unsure about the condition of your roof, a professional inspection gives you a clear picture without any guesswork.
Step 6: When to Call Brandon J Roofing
DIY sealing works great for small, accessible problems. But some situations call for a professional — and knowing the difference protects both your safety and your roof’s lifespan.
Safety Risks
Steep roofs, wet surfaces, and tall heights make roofing one of the more dangerous home improvement tasks. One wrong step can lead to a serious fall. If your roof’s pitch is steep or the damage is near the ridge, leave it to the pros.
Warranty Concerns
Many metal roof warranties have specific clauses about unauthorized repairs. Using the wrong sealant or DIY methods can void your warranty entirely. A professional repair protects your investment and keeps your warranty intact.
Large-Scale or Complex Damage
A tube of sealant won’t fix:
- Large sections of separated seams
- Extensive rust or corrosion
- Damaged or improperly installed flashing
- Leaks caused by structural issues
These issues need a full roofing repair service — not a quick patch.
You’re Not Sure Where the Leak Is Coming From
Tracking down a hidden leak is tricky. If you’ve already tried sealing and the drip keeps coming back, a professional can find the source quickly and fix it right the first time. This is especially true when dealing with leaks that seem minor but keep returning — don’t underestimate what a persistent drip can do to your home’s structure over time.
A Metal Roof That Shields You Every Season
Metal roofs are one of the best investments you can make for your home — but only if you take care of them. From cleaning and priming to choosing the right sealant and applying it correctly, every step in this guide brings you closer to a watertight roof that lasts. That’s where we come in!
At Brandon J Roofing, we’ve helped countless homeowners protect their roofs with expert repairs, honest advice, and quality workmanship that lasts. If your leak is too stubborn to tackle on your own — or you just want peace of mind knowing it’s done right — our team is ready to help. Don’t let a small problem turn into a costly disaster.