Metal Roof Flashing: Installation Techniques and Best Practices for Durability
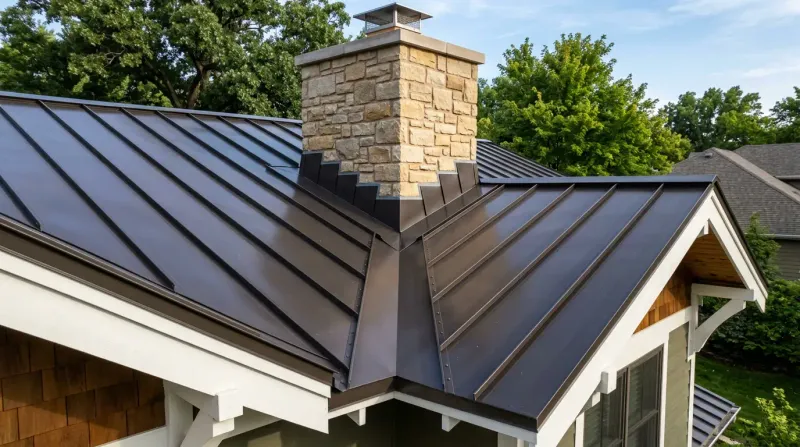
Proper metal roof flashing is critical to your roof’s longevity and performance. Even the highest-quality metal roofing can fail prematurely when flashing is installed incorrectly, leading to water infiltration that causes rust, structural damage, and costly interior repairs to various roof parts. Many roofing issues stem not from the metal panels themselves, but from improperly sealed transitions and penetrations where water can enter.
In this comprehensive guide, you’ll learn essential techniques for correctly flashing metal roof systems, with detailed step-by-step instructions for critical areas such as valleys and pipe penetrations. We’ll cover the tools and materials you’ll need, highlight common installation mistakes, and explain how to create watertight seals at every vulnerable point. Whether you’re tackling a DIY project or preparing to work with a professional in flat roof repairs, this knowledge will help ensure your metal roof remains watertight for decades.
Understanding Different Types of Metal Roof Flashing
Flashing serves as the critical defense system for your roof’s most vulnerable areas. Before diving into installation techniques, let’s examine the main flashing types you’ll encounter:
Valley Flashing
Valley flashing metal roof installations are particularly important as they handle large volumes of water. These V-shaped channels, where two roof planes meet, collect and direct water toward gutters. Because valleys manage significant water flow, proper installation here is essential to prevent leaks.
Pipe Boots
Pipe boots are pre-formed flashing units designed to seal around plumbing vents, exhaust pipes, and other round penetrations. They typically include a flexible rubber collar that creates a watertight seal around the pipe.
Chimney and Wall Flashing
Step flashing and counter flashing work together to protect the intersection where a roof meets a vertical wall or chimney. This multi-piece system allows water to flow down the roof without entering the building envelope.
Transition Flashing
Metal roof transitions occur wherever the roof plane changes direction or meets a different roofing material. These areas require specialized flashing to maintain watertight integrity across the transition points.
Essential Tools and Materials for Metal Roof Flashing
Before starting any flashing installation, gather these essential tools and materials:
Tools:
- Tin snips or metal shears
- Tape measure
- Chalk line
- Drill with metal bits
- Rivet gun
- Caulking gun
- Hand seamer
- Roofing hammer
- Safety equipment (gloves, eye protection, fall protection)
Materials:
- Flashing materials (matching your roof metal type and gauge)
- Butyl tape or sealant
- Self-drilling screws with rubber washers
- Rivets
- High-quality polyurethane caulk
- Roof cement (for certain applications)
- Cleaner/degreaser
The quality of your materials directly impacts the durability of your flashing installation. Always choose materials specifically designed for metal roofing applications and compatible with your roofing system.
Valley Flashing Installation: Step-by-Step Guide
Valley areas require special attention as they channel significant water volume. Here’s how to flash metal roof valleys properly:
- Prepare the valley area: Clear debris and ensure the substrate is clean and dry.
- Install underlayment: Apply a self-adhering waterproof underlayment extending at least 18 inches from the center of the valley on both sides.
- Measure and cut the flashing: Valley flashing should extend at least 8 inches from the valley center on both sides. Cut your valley flashing to the appropriate length, allowing extra at the top and bottom.
- Position the flashing: Center the valley flashing metal roof piece in the valley, ensuring it lies flat.
- Secure the flashing: Attach it using screws with neoprene washers, along the outer edges only. Never place fasteners in the center of the valley where water flows.
- Allow for expansion: When joining multiple pieces of valley flashing, overlap sections by at least 6 inches in the direction of water flow, and apply butyl tape between overlapping sections.
- Install roofing panels: When installing metal roofing panels alongside valleys, maintain a minimum 4-6-inch gap between panel edges and the valley center to allow proper water flow.
This method ensures water flows freely down the valley without seeping under the metal panels, protecting your roof structure for years to come.
Installing Pipe Boots: Ensuring Watertight Seals
Pipe penetrations present significant leak risks if not properly flashed. Follow these steps to install pipe boots correctly:
- Select the right pipe boot: Choose a boot that matches your roof profile and has the correct diameter for your pipe.
- Prepare the area: Clean the roof surface around the penetration.
- Apply sealant: Run a bead of butyl sealant around the pipe penetration on the underlayment.
- Install the boot: Slide the pipe boot over the pipe and position it so the base conforms to the roof profile.
- Secure the base: Fasten the base to the roof using appropriate screws with rubber washers, placing fasteners every 1-2 inches around the perimeter of the flange.
- Seal the top: If the rubber collar doesn’t create a tight seal against the pipe, secure it with a stainless steel clamp and apply additional sealant between the collar and the pipe.
- Apply sealant: Add a final bead of polyurethane sealant around all edges of the boot flange and the top edge of the rubber collar.
Remember that proper pipe boot installation is crucial for preventing one of the most common sources of roof leaks. Take your time with this step to ensure a completely watertight seal.
Metal Roof Transitions and Common Mistakes
Metal roof transitions require careful planning and execution to prevent water infiltration. When moving from one roof plane to another or changing materials, keep these principles in mind:
Critical Transition Areas:
- Roof-to-wall connections
- Change in roof pitch
- Eave to ridge transitions
- Material change points
Common Mistakes to Avoid:
- Improper overlap: Always overlap flashing in the direction of water flow, never against it.
- Insufficient sealant: Use appropriate sealants generously at critical junctions.
- Over-reliance on caulk: Caulk should be your secondary defense, not your primary water barrier.
- Using incompatible metals: Different metals can cause galvanic corrosion when they come into contact.
- Incorrect fastener placement: Never place fasteners where they might create water entry points.
- Failing to allow for thermal movement: Metal expands and contracts; proper installation accounts for this movement.
Creating successful metal roof transitions requires understanding how water flows across your roof and designing flashing systems that work with gravity, not against it. Remember that water will always find the path of least resistance, so even small mistakes can lead to significant leaks.
Finishing Touches: Ridge Caps and Ends
The ridge is another vulnerable area of your metal roof that requires proper flashing techniques:
Ridge Cap Installation:
- Install ridge cap pieces, overlapping each section by at least 3 inches.
- Secure with screws through the pre-drilled holes, or according to the manufacturer’s specifications.
- Apply butyl tape between overlapping sections.
How to Finish Metal Ridge Cap Ends
To properly finish metal ridge cap ends, follow these steps:
- Measure and mark: Determine where to terminate the ridge cap, allowing for the appropriate overhang.
- Cut the end piece: Create a custom end cap by cutting and bending a matching piece of metal, or use a prefabricated ridge cap end.
- Shape the end piece: For custom ends, fold the metal to create a closed end that prevents water entry.
- Apply sealant: Apply butyl tape or sealant to all connection points.
- Secure the end cap: Attach the end cap to the last ridge cap section with rivets or screws with neoprene washers.
- Seal all edges: Apply a final bead of polyurethane sealant around all edges of the end cap.
Properly fabricated end caps are essential for both aesthetics and weather protection. Taking time to finish the metal ridge cap ends correctly gives your roof a polished look while preventing water infiltration at these vulnerable points.
When to Call a Professional Roofer
While many homeowners can handle basic flashing repairs, some situations call for professional expertise:
- Complex roof geometries with multiple valleys and transitions
- High-pitch roofs or difficult access points
- Historic or specialty metal roofing systems
- Signs of existing water damage or structural issues
- Local building codes require licensed contractors
- Warranty considerations for your roofing system
Remember that improper flashing installation can void manufacturer warranties and lead to costly damage. If you’re unsure about any aspect of metal roof flashing, consulting a professional can save you money and headaches in the long run.
Professional roofers have specialized tools, extensive experience with challenging details, and the safety equipment necessary for proper installation. They can also spot potential problems that might not be obvious to the untrained eye. For more information about how professional installation differs from DIY approaches, check out ourguide to professional metal roof installation techniques.
Metal Roofing You Can Rely On
Proper metal roof flashing is the difference between a roof that lasts for decades and one that develops problems after just a few seasons. By understanding the principles behind effective flashing installation and following the step-by-step techniques outlined in this guide, you’re now better equipped to protect your metal roof investment. Remember that patience and attention to detail are your greatest allies when installing flashing components.
Brandon J Roofing brings decades of specialized metal roofing expertise to every project, ensuring flawless flashing installation that withstands the toughest weather conditions. Our technicians are factory-trained in the latest techniques and use only premium materials that perfectly match your roofing system. Whether you need comprehensiveroofing repair services or have questions about metal roof installation, our team is ready to deliver solutions that exceed expectations.